This is a step by step on how to create an asp.net C# web application using simplified Duwamish framework. I call it simplified Duwamish framework, because it is not the real Duwamish. It is my own version. I like it better, after eliminating some parts of the Duwamish framework I rarely use.
FYI, sample for the Duwamish template is already provided when installing Visual Studio .Net 2003.
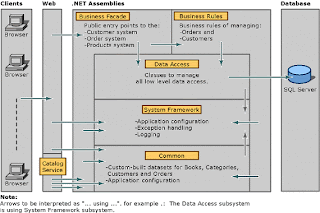
This is a picture which describes the plot of Duwamish framework.

Picture Source :
http://madgeek.com/Articles/SOA/EN/SOA-Softly.htmlFor more information about Duwamish, refer to
http://msdn.microsoft.com/en-us/library/aa288561(VS.71).aspxFor my Simplified Duwamish framework, I only use these projects:
- BusinessFacade (Class Library)
- DataAccess (Class Library)
- Common (Class Library)
- Control (Class Library) -> this project is not in Duwamish framework
- Web Application (ASP.NET Web Application)
1. Create a blank solution
Menu File -> New Project -> Visual C# -> Other Project Types -> Visual Studio Solutions -> Blank Solution, name the solution, and it will appear on the right side of the Solution Explorer.
2. Some things which should be known:
- Common -> does not depend on any other projects
- Control -> depends on Common
- DataAccess -> depends on Common
- BusinessFacade -> depends on Common and DataAccess
- Web Application -> depends on BusinessFacade, Common, and Control
Therefore, this would be the order used in creating projects in the solution.
To create a new project, right-click on the solution, choose Visual C#, then choose the project type.
3. Create Common Project
Add a new project of type Class Library, then name it Common. A class named Class1.cs will be automatically created. It can be renamed later.
4. Create Control Project
Add a new project of type Class Library, then name it Control. A class named Class1.cs will be automatically created. It can be renamed later.
5. Create DataAccess Project
Add a new project of type Class Library, then name it DataAccess. A class named Class1.cs will be automatically created. It can be renamed later.
6. Create BusinessFacade Project
Add a new project of type Class Library, then name it DataAccess. A class named Class1.cs will be automatically created. It can be renamed later.
7. Create Web Application Project
Add a new project of type ASP.Net Web Application, then name the web. A page named Default.aspx will be automatically created. This is usually set as the default page of the web.
8. Manage Project Dependencies
Manage project dependencies as explained in step 2. Right-click on the solution, then choose Project Dependencies.
- Common does not depend on any other projects, so we just skip this.
- Choose Control -> Check Common, since Control depends on Common.
- Choose DataAccess -> Check Common.
- Choose BusinessFacade -> Check DataAccess and Common.
- Choose Web Application -> Check BusinessFacace, Common, and Control.
Then, OK.
9. Adding Project References to the projects
To add references to the project, right-click on the project, choose tab Projects, then choose the project to be referenced.
- Control -> Add reference to Common.
- DataAccess -> Add reference to Common.
- BusinessFacade -> Add references to DataAccess and Common.
- Web Application -> Add references to BusinessFacade, Common, and Control.
10. Setting start-up project and start-up page
Right-click on the Web Application project, then Set as StartUp Project.
Right-click on the index page, then Set as Start Page (Default.aspx is usually set as start page).
11. Rebuild the Solution by right-clicking on the solution, then rebuild.
12. Running in debug mode may be necessary for the first time, after creating the application. Just press F5 to debug.
13. That’s all folks.


